


Unity is a cross-platform game development engine that is used to create 2D and 3D games on a variety of platforms, including PCs, mobile devices, and game consoles. In this article, we'll look at how to create a 3D Unity game using the Roll-A-Ball project.
The Roll-A-Ball project is a classic game in which the player controls a ball and collects coins. It is ideal for beginning developers because it doesn't require a lot of code and provides a good basis for learning basic Unity concepts, such as creating a scene, setting up a camera, creating and manipulating objects.
Step 1: Installing Unity

The first step to creating a 3D game with Unity is to install the engine itself. Unity can be downloaded from the official website: https://unity.com/. You must select the appropriate version and install it on your computer.
Step 2: Creating a new project
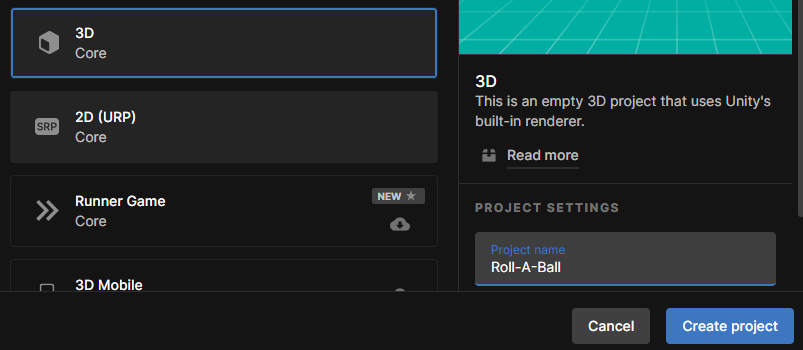
After you install Unity, you need to create a new project. To do this, launch Unity and click New in the Project Wizard window. Enter a project name and select a location where you want to save the project. Then click the Create button.
Step 3: Creating a scene
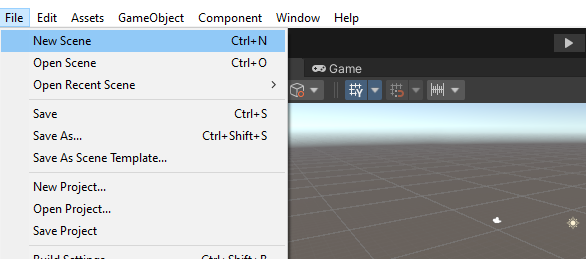
After creating a new project, we need to create a scene for our game. To do this, select File -> New Scene from the Unity main menu. Then click on the “Save” button and select the location where you want to save the scene.
Step 4: Adding objects
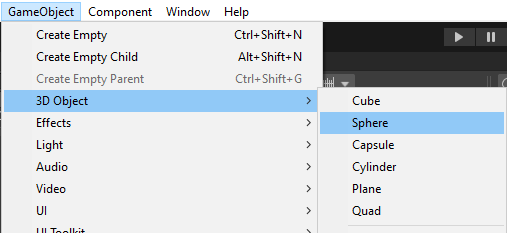
We're now ready to start adding objects to the scene. To create a ball, choose GameObject -> 3D Object -> Sphere from the Unity main menu. Then change the size of the ball by right-clicking on an object in the hierarchy and choosing “Scale”. Change the ball scale value to (0.5, 0.5, 0.5).
To create a floor, choose GameObject -> 3D Object -> Plane. Then change the plane scale to (5, 1, 5).
Step 5: Creating materials
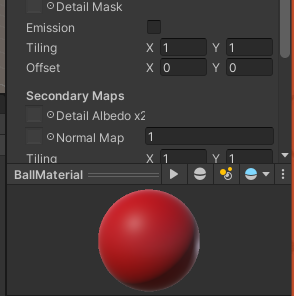
We are now ready to add materials to our properties.
Select Assets -> Create -> Material from the Unity main menu. Then name the material “BallMaterial” and set the ball color to red. To do this, select a color in the Inspector window for the new material.
Similarly, create a floor material by calling it “FloorMaterial”. Set the floor color to blue.
Step 6: Purpose of materials
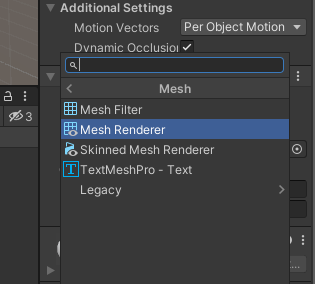
We are now ready to assign the created materials to our facilities. Right click on the ball in the hierarchy and select Add Component -> Mesh Renderer from the context menu.
In the Inspector window, select the previously created BallMaterial material in the Materials section.
Now do the same for the plane. Right click on a plane in the hierarchy and choose Add Component -> Mesh Renderer from the context menu. In the Inspector window, select the previously created “FloorMaterial” material in the “Materials” section.
Step 7: Camera setup
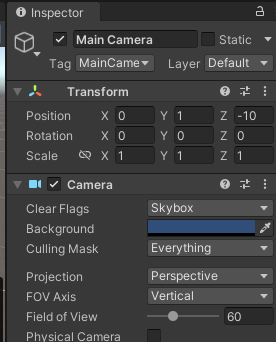
We're now ready to set up the camera. Select GameObject -> Create Empty from the Unity main menu to create an empty object. Call it “Main Camera”. Then select the new “Main Camera” object in the hierarchy and set the following parameters in the Inspector window:
Field of View (FOV): 60
Distance to the near cutoff plane: 0.3
Distance to the far cutoff plane (Far): 1000
Step 8: Creating scripts
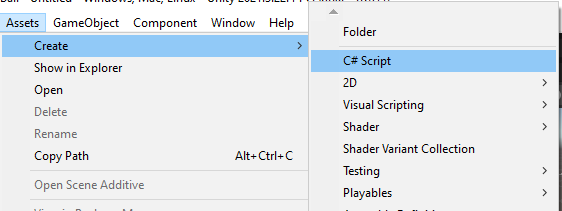
Now we're ready to create scripts to control the ball and collect coins. Create a new “Scripts” folder in the Project window. Right click on the created folder and select Create -> C# Script.
Name the first script “PlayerController”. This script will control the ball.
Open the script and enter the following code:
.png)
This script determines how the ball will move through the level.
The “speed” field determines the speed at which the ball moves. The “rb” variable contains the Rigidbody component that we'll use to move the ball. In the “Start” method, we get the Rigidbody component for the ball. In the “FixedUpdate” method, we receive input from the user using the “Input.getAxis” functions. These functions return horizontal and vertical axis values (for the keyboard, these are A/D and W/S, respectively). We then create a new “movement” vector from these values and add force directed in that direction using the “RB.addForce” method.
Save your script and return to the Unity editor.
Right click on the ball in the hierarchy and select “Add Component” -> “Scripts” -> “PlayerController” from the context menu. In the Player Controller (Script) section of the Inspector window, set Speed to 10.
.png)
Create another script that we'll use to collect coins. Right click on the Scripts folder in the Project window and select Create -> C# Script.
Name the script “Rotator”. Open the script and enter the following code:
.png)
This script rotates coins around its axis. We use the “Transform.rotate” function to rotate coins 15 degrees around the X axis, 30 degrees around the Y axis, and 45 degrees around the Z axis. We also multiply this vector by “Time.deltaTime” to make the rotation smooth and time-dependent.
Save your script and return to the Unity editor. Right-click on a coin in the hierarchy and select “Add Component” -> “Scripts” -> “Rotator” from the context menu.
Step 9: Coin placement
.png)
We're now ready to add coins to our level. Create an empty object and name it “Coins”. We will store all the coins in this facility.
Create another empty object inside “Coins” and name it “Coin”.
.png)
We will use the Coin object as a prototype for each coin. Create a copy of the “Coin” object by right-clicking on it in the hierarchy and selecting “Duplicate” from the context menu. Move a copy of the Coin object to the desired location on the level using the “Move” tool in the left toolbar or the W/A/S/D keys. Repeat this process until you've added all the coins to the level.
Now we have to make it so that the ball can collect coins. Open the PlayerController script and add the following code to the “void onTriggerEnter (Collider other)” method:
This code checks if the object hit by the balloon has the “Coin” tag, then we will deactivate this object using the “setActive (false)” method. This will hide the coin and it will no longer appear on the level.
Save your script and return to the Unity editor. Select any coin at the level in the hierarchy and set the “Tag” value to “Coin” in the “Inspector” window.
Now you can start the game and collect coins by moving the ball across the level using the keyboard or WASD.
Step 10: Add sounds
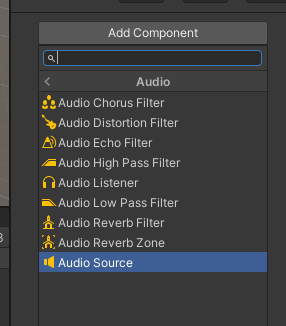
Finally, we can add sound effects to our game. Create an “Audio” folder in the Project window. Then drag and drop any audio file into this folder. For example, you can use the “coin_pickup.wav” sound that can be found on the Internet.
Create a new empty object in the hierarchy and name it “Audio Manager”. Add the Audio Source component to the Audio Manager object. Under “Audio Source” in the Inspector window, select the sound file you added to the Audio folder. Check “Loop” and “Play On Awake”. This will make the sound play indefinitely when the game is running.
.png)
Open the PlayerController script and add the following code to the “void onTriggerEnter (Collider other)” method:
This code gets the “Audio Source” component from the “Audio Manager” object and calls the “Play” method to play the “Pickup” sound. Note that this code uses “getComponent” to get the “Audio Source” component from another object in the scene.
Now we need to determine what should happen when collecting all the coins on the level. We'll use the Level Manager component to determine this.
Go back to the Level Manager object and add the following code:
This code adds a public method called “LoadNextLevel” that loads the next level in the scene using the “loadScene” method from the “SceneManager” component. We'll call this method when all the coins in the level have been collected.
Now go back to the “Player” object and open the “PlayerController” script. Add the following code at the top of the script after defining the variables:
This code adds two public variables “CoinCount” and “CoinTotal”, which we'll use to count the coins collected and the total number of coins per level, respectively. We also add the “LevelManager” variable to access the “Level Manager” component from the “PlayerController” script.
Now, in the “OnTriggerEnter” function, after the code that processes coin collection, add the following code:
This code increases the value of the “CoinCount” variable by 1 each time a player collects a coin. It then checks whether the “CoinCount” value is equal to the total number of coins at the level stored in the “CoinTotal” variable. If so, we call the “LoadNextLevel” method from the Level Manager component, which loads the next level in the scene.
.png)
Now we're done creating Roll-A-Ball on Unity! You can start the game and enjoy completing levels by collecting coins and controlling the ball. I hope this guide has helped you learn the basics of making Unity games and gave you some ideas on how you can use this powerful platform to build your own.
Well, if you want to learn how to create 3D games yourself, sign up for a free Unity trial lesson at our Progkids programming school for kids.
The full script code is available here: https://github.com/KarenConstantine/roll-a-ball/blob/main/3d.txt
Karen Konstantin
Progkids teacher


